16. 시멘틱 태그 ( sementic tag )
개념: '의미를 갖는다' 뜻으로 각 태그가 자신만의 의미가 있음을 뜻함.
종류:
<header>: 웹사이트 소개 정보나 메뉴, 로고 등이 포함될 수 있음.
과거에는 <div id="header"> 형식으로 사용됨.
현재는 <header> 로 지정해서 사용됨.
<main> : 웹사이트의 메인 항목 포함.
과거에는 <div id="main"> 형식으로 사용됨.
<section> : 실제 문서 내용 포함
<article> : 문서내용이 많을 경우에 여러 개의 주제로 나눌수 있음.
<nav> : 사이트의 메뉴나 링크 포함.
<aside> : 배너 광고 포함.
<footer> : 회사소개, 저작권 정보등 문서 하단에 배치되는 항목 포함.
17. 사용자 입력 태그 ( ******* )
==> 반드시 <form> 태그로 감싸야 된다.
버튼을 클릭했을때 사용자 입력값이 서버에 전달될 수 있다.
문법:
<form action="타켓">
사용자입력태그
..
<button>전송</button> <== 전달가능.
<input type="submit" value="전송"> <== 전달가능.
<input type="button" value="전송"> <== 서버로 전달이 안됨. JS 추가해야지만 전달이가능
</form>
가. 단일값 입력
<input type="text" name="">
<input type="text" name="" maxlength="4" required> <== 반드시 값을 입력 필요.
유효성검사를 클라이언트뿐만 아니라 서버에서도 해야 된다.
나. 비밀번호 입력
<input type="password" name="password">
다. radio
==> 하나만 선택 가능하게 하기 위해서 동일한 name 을 지정해야된다.
==> 초기화 방법: checked 속성이용
checked="checked" 또는 checked
<input type="radio" name="gender"> 남
<input type="radio" name="gender" checked> 여
라. checkbox
<input type="checkbox" name="">
마. email
- 이메일형식에 맞게 입력해야된다.
@ 가 없으면 submit 불가
<input type="email" name="email">
바. file
<input type="file" name="file">
사. date
<input type="date" name="xxx">
아. Color
<input type="color" name="yyy">
자. textarea
<textarea name="description" cols="30" rows="10"></textarea>
차. select
<select name="학년">
<option value="1">1학년</option>
<option value="2">2학년</option>
<option value="3">3학년</option>
</select>
<!DOCTYPE html>
<html lang="en">
<head>
<title>사용자입력</title>
</head>
<body>
<!-- input tag 들이 form 태그로 감싸져있어야지만 서버에 전달될수있다. -->
<form>
아이디: <input type="text" name="userid1"><br>
아이디: <input type="text" name="userid2" value="userid2"><br>
아이디: <input type="text" name="userid2" placeholder="아이디를 입력하시오."><br>
<hr>
비밀번호: <input type="password" name="password"><br>
<hr>
성별:
<!-- 하나만 선택가능하기위해서는 동일한 name 지정해야함. -->
<input type="radio" name="gender">남
<input type="radio" name="gender" checked="checked">여<br>
<input type="radio" name="gender" checked>여<br>
<hr>
취미:
<input type="checkbox" name="hobby">야구
<input type="checkbox" name="hobby">농구
<input type="checkbox" name="hobby">축구
<br>
이메일
<input type="email" name="email"> <button>전송1</button>
<input type="submit" value="전송2">
<input type="button" value="전송3">
<hr>
number<br>
<input type="number" name="age"><br> <!-- 기본(음수~양수) -->
<input type="number" name="age" min="0"><br> <!-- 양수까지만 -->
<input type="number" name="age" min="0" max="5"><br> <!-- 0 ~ 5 -->
<input type="number" name="age" step="2"> <!-- 2씩증가 -->
<hr>
search
<input type="search" name="username">
<hr>
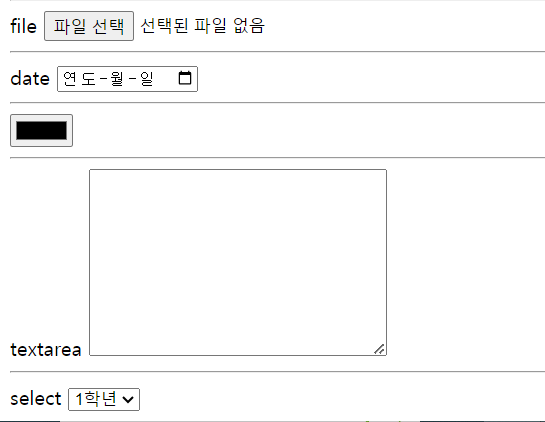
file
<input type="file" name="file">
<hr>
date
<input type="date" name="xxx">
<hr>
<input type="color" name="yyy">
<hr>
textarea
<textarea name="description" cols="30" rows="10"></textarea>
<hr>
select
<select name="학년">
<option value="1">1학년</option>
<option value="2">2학년</option>
<option value="3">3학년</option>
</select>
</form>
</body>
</html>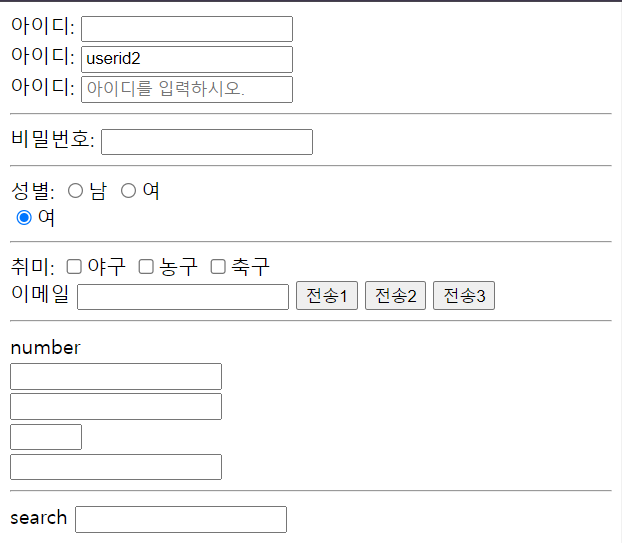
18. form 태그
==> 반드시 <form> 태그로 감싸야 된다.
버튼을 클릭했을때 사용자 입력값이 서버에 전달될 수 있다.
문법:
<form action="target.html" method="get | post">
사용자입력태그
..
<button>전송</button> <== 전달가능.
<input type="submit" value="전송"> <== 전달가능.
<input type="button" value="전송"> <== 서버로 전달이 안됨. JS 추가해야지만 전달이가능
</form>
==> 사용자가 입력한 데이터(폼데이터)가 서버로 전달되는 방법 2가지
가. GET 방식
- 기본방식이고 URL 에 사용자 입력한 폼데이터가 포함되어 전달된다.
- 표현식:
http://127.0.0.1:5500/20240418/xxxx.html?userid1=xxx&password=xxxx
http://localhost:5500/타켓?[input태그의name값]=[입력값]&[input태그의name값]=[입력값]
- ? 앞까지가 URL 이고 ? 뒤가 폼데이터이다.
userid1=xxx&password=xxxx <== query string 이라고 부른다.
query string 은 URL 에 포함되지않는다.
- 서블릿에서 doGet 메서드가 처리함.
나. POST 방식
- URL 에 사용자 입력한 폼데이터가 포함되어 전달되지 않지만
내부적으로 전달한다.
- 표현식: http://127.0.0.1:5500/target.html
userid1=aaa
password=1234
- 서블릿에서 doPost 메서드가 처리함.
만약에 일치하는 메서드가 없으면 405(허용하지 않는 메서드) 에러가 발생됨.
<!DOCTYPE html>
<html lang="en">

<head>
    <title>사용자입력</title>
</head>

<body>
    <h1>GET</h1>
    <!-- 기본은 get 방식 (get | post 방식이 있음.) -->
    <form action="/20240418/target.html" method="get">
        아이디: <input type="text" name="userid1"><br>
        비밀번호: <input type="password" name="password"><br>
        email: <input type="email" name="email"><br>
        <button>전송1</button>
        <input type="submit" value="전송2">
        <input type="button" value="전송3">
    </form>

    <h1>POST</h1>
    <!-- 기본은 get 방식 (get | post 방식이 있음.) -->
    <!-- html 이라서 post 처리를 못해서 에러가 발생, java 로 처리해야함. -->
    <form action="/20240418/target.html" method="post">
        아이디: <input type="text" name="userid1"><br>
        비밀번호: <input type="password" name="password"><br>
        <button>전송1</button>
        <input type="submit" value="전송2">
        <input type="button" value="전송3">
    </form>

</body>

</html>
19. image 보여주기
- png, jpg 가능함.
- 문법
<img scr="절대 | 상대" width="" height="" alt="대체텍스트" >
<!DOCTYPE html>
<html lang="en">

<head>
    <title>image</title>
    <meta charset="UTF-8">
    <meta name="viewport" content="width=device-width, initial-scale=1.0">
</head>

<body>
    <h3>[절대경로]</h3>
    <img src="/images/logo_daum.png" alt="daum logo 이미지"><br>
    <img src="/images/logo_daum2.png" alt="daum logo 이미지"><br>
    <img src="/images/logo_daum.png" alt="daum logo 이미지" width="50" height="50"><br>

    <h3>[상대경로]</h3>
    <img src="images/logo_daum.png" alt="daum logo 이미지"><br>
</body>

</html>
20. 화면 재사용하기
- <iframe src=""></iframe>
<!DOCTYPE html>
<html lang="en">

<head>
    <title>IFrame</title>
    <meta charset="UTF-8">
    <meta name="viewport" content="width=device-width, initial-scale=1.0">
</head>

<body>
    <h1>Main 화면</h1>
    <!-- 아래에 target.html 포함시킴 -->
    <iframe src="/20240418/target.html" frameborder="1"></iframe>
</body>

</html>
21. 특수문자
- html은 스페이스바 및 탭이 적용안됨.
공백역할:
< : <
> : >
" : "
<!DOCTYPE html>
<html lang="en">
<head>
<title>특수문자</title>
<meta charset="UTF-8">
<meta name="viewport" content="width=device-width, initial-scale=1.0">
</head>
<body>
"AAAA<br>
3 < 4<br>
3 > 4<br>
hello world<br>
hello world<br>
</body>
</html>
* 참고사이트
http://www.w3schools.com ( 초급자용 )
http://developer.mozilla.org ( 중급자용 )
'[study]이론정리 > HTML & CSS & JavaScript' 카테고리의 다른 글
| CSS 1일차 - 선택자 (0) | 2024.04.22 |
|---|---|
| CSS 1일차 - 적용방법3가지, 캐스캐이딩 & 명시도 (0) | 2024.04.22 |
| HTML 2일차 - table, list, span (0) | 2024.04.22 |
| HTML 2일차 - 1일차 요점 (0) | 2024.04.22 |
| HTML 1일차 - a, 링크, 경로 (1) | 2024.04.18 |

